Configure Sites and POS Terminals in Data Management
To configure sites and POS terminals in Data Management for mandatory matching to the certification, complete the following steps:
Step | Topic | Description |
|---|---|---|
1 | Configuration tax settings. | |
2 | Configuration settings for receipt creation, editing, and printing. | |
3 | Configuration settings for terminal schemes and site preferences. | |
4 | Configuration settings for payment types and order destinations. | |
5 | Configuration settings for item void triggering events and the response reason codes. | |
6 | Steps to ensure WEB-SRM is configured for additional transaction types. | |
7 | Configuration settings for POS devices. | |
8 | Configuration settings for language translations. | |
9 | Configuration settings to enable fiscal log access in the POS terminals. |
Note
The WEB-SRM service configuration settings should be revised for the following scenarios:
Changing the restaurant ownership.
Changing the tax identifier.
Adding new payment methods.
Adding new delivery partners.
Taxation
Genius Portal → 4-Dot Menu → Data Management → Ordering Settings
From Data Management → Ordering Settings, define the following:
From the Tax Jurisdictions subsection - Taxes → Tax Jurisdictions → Tax Jurisdiction List → New Tax Jurisdiction. From General, define the following:
Field Name
Value
Description
Jurisdiction Name
Any unique name to identify the entity
Based on the Jurisdiction Type, the tax amounts are summed up to the QST/GST totals sent to the WEB-SRM service, printed on receipts, and shown in the User Report.
Jurisdiction Type
Create the first Tax Jurisdiction with the type Federal.
Create the second Tax Jurisdiction with the type State/Province.
External ID
Type an external identifier that is used by third-party services.
Valid values:
Alphanumeric characters (hyphen and underscore are supported)
Maximum of forty (40) characters
Case-sensitive
From the Tax Rates subsection - Taxes → Tax Rates → New Tax Definition. From General, define the following:
Field Name
Value
Description
Name
First tax rate: GST (in English) or TPS (in French).
Second tax rate: QST (in English) or TVQ (in French).
The name is printed on receipts, which is why it is recommended to use official names. The value is used in tax calculation.
Type
Fixed Rate
The Tax Rates are to be configured in to support the legal requirements of the tax amount calculation.
Jurisdiction
There are two mandatory tax rates to be configured:
Name
Jurisdiction
Value
GST (or TPS)
Federal
5
QST (or TVQ)
State/Province
9.975
Based on the Jurisdiction Type, the tax amounts are summed up to the QST/GST totals sent to the WEB-SRM service, printed on receipts, and shown in the User Report.
See Taxes - General (Fixed Rate) for additional information on this configuration.
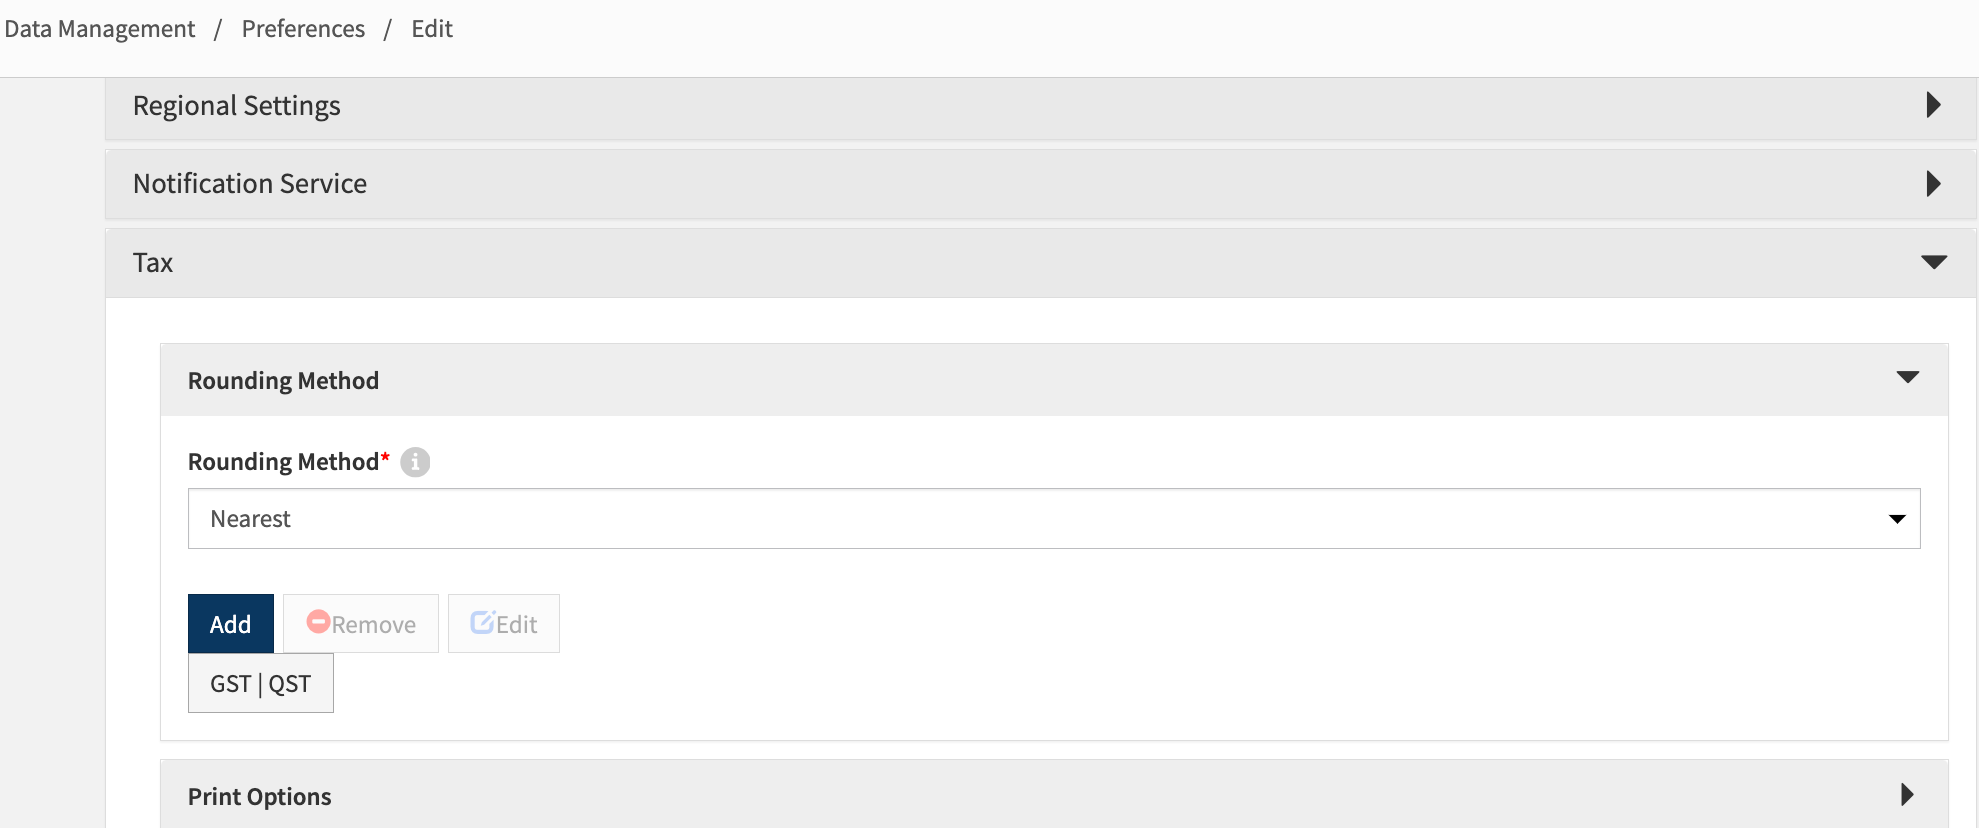
From Site Preferences - Settings → Preferences → Edit site preferences → Select Site → Site Preferences → Tax → Rounding Method, define the following:
Section
Value
Description
Rounding Method
Nearest
Legal requirements: Only fractions equal to or greater than one-half of a cent ($0.005) must be rounded to a whole cent ($0.01).
See https://www.revenuquebec.ca-taxes for additional information.
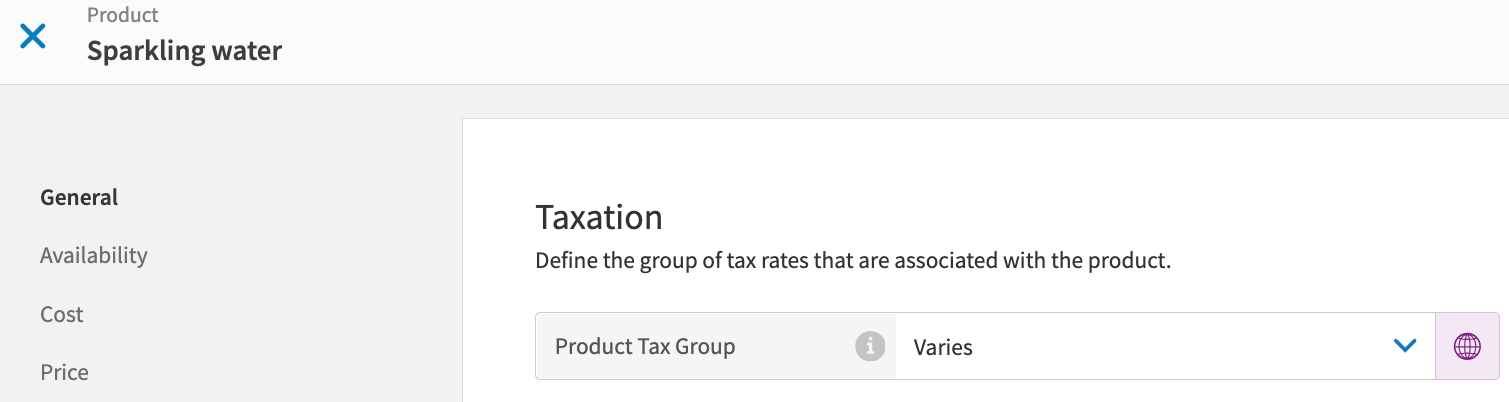
From Taxation - Modifiers → Modifiers List → General → Taxation, define the following:
Field Name
Value
Description
Product Tax Group
Assign the needed Tax Groups to link the Tax Rates with the products and modifiers.
See Product Tax Group for configuration steps.
Each product and modifier, for which the tax is calculated, is printed on receipts and sent to the WEB-SRM service with the tax attribute that corresponds to the applied taxes.
Note
The child item tax attributes are included for a parent product, which has child items and modifiers with applied taxes.
Screen Captures


Receipts
Genius Portal → 4-Dot Menu → Data Management → Ordering Settings → Receipts
To create receipt templates for the WEB-SRM integration:
From Receipts, select Receipt Templates.
From the Receipt Template List homepage, select New Receipt Template and create templates for the following:
Receipt
Refund
Note
See Receipt Templates for additional general information for this configuration.
From Receipts, select Receipt Templates and configure the following for the WEB-SRM service integration:
Section | Value | Description |
|---|---|---|
Receipt Template | For Receipt, Final Receipt, Guest Check, and Refund, only certified receipt content can be used. Contact your Global Payments representative for the receipt content text files. | All other templates can be used as default or custom because they are not fiscal. All fiscal documents must be in French. |
Options and Sorts | Extra Print Elements: uncheck Tax identifiers. For a site with enabled WEB-SRM service, there is no need to enable the Tax identifiers receipt setting because POS uses and prints Tax Identifiers automatically. |
Screen Capture

Forbidden Operations
Genius Portal → 4-Dot Menu → Data Management → Ordering Settings
From Data Management → Ordering Settings, define the following:
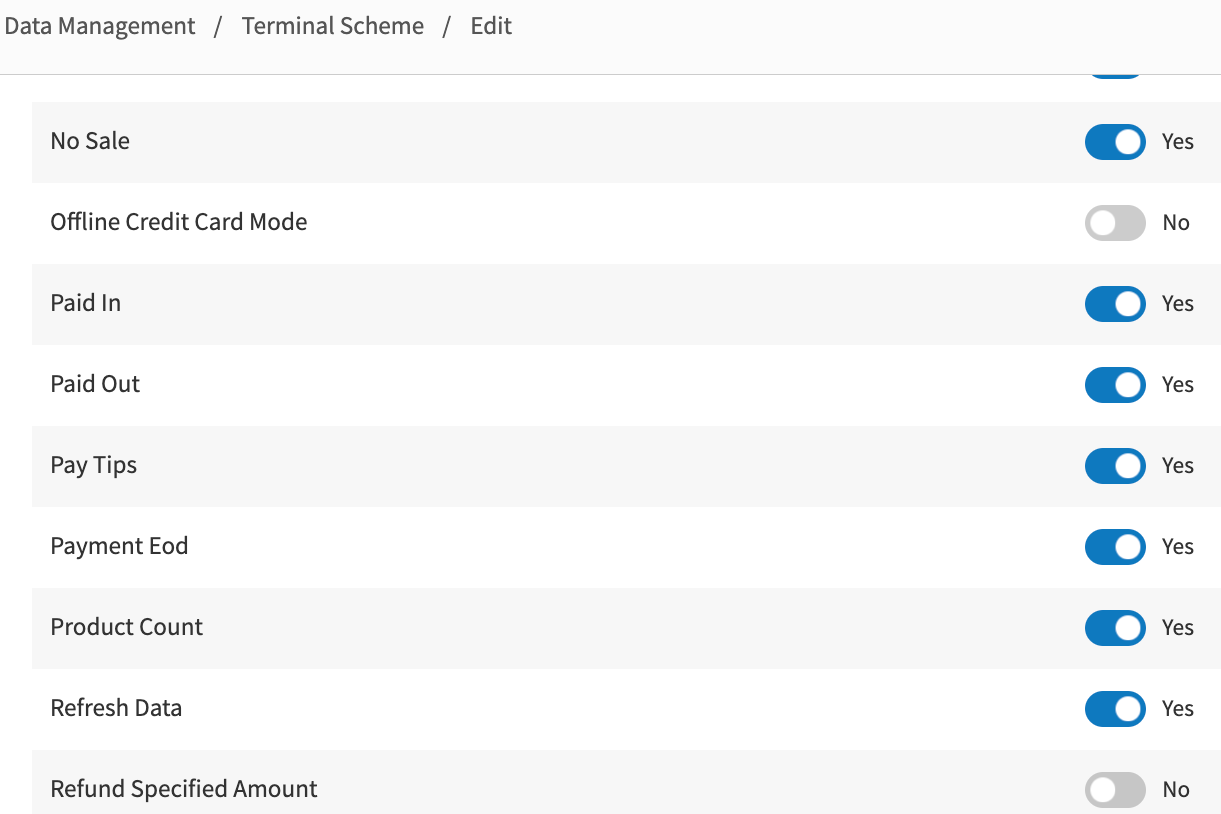
From Terminal Scheme, define the following:
Section
Value
Description
Functions & External Applications
Disable the following functions:
Refund Specified Amount
Create Refund Order
Return
Training Mode
The WEB-SRM service does not allow refund or credit note transactions without referencing the previous sale transaction. It is forbidden to use these operations for a site with enabled WEB-SRM service.
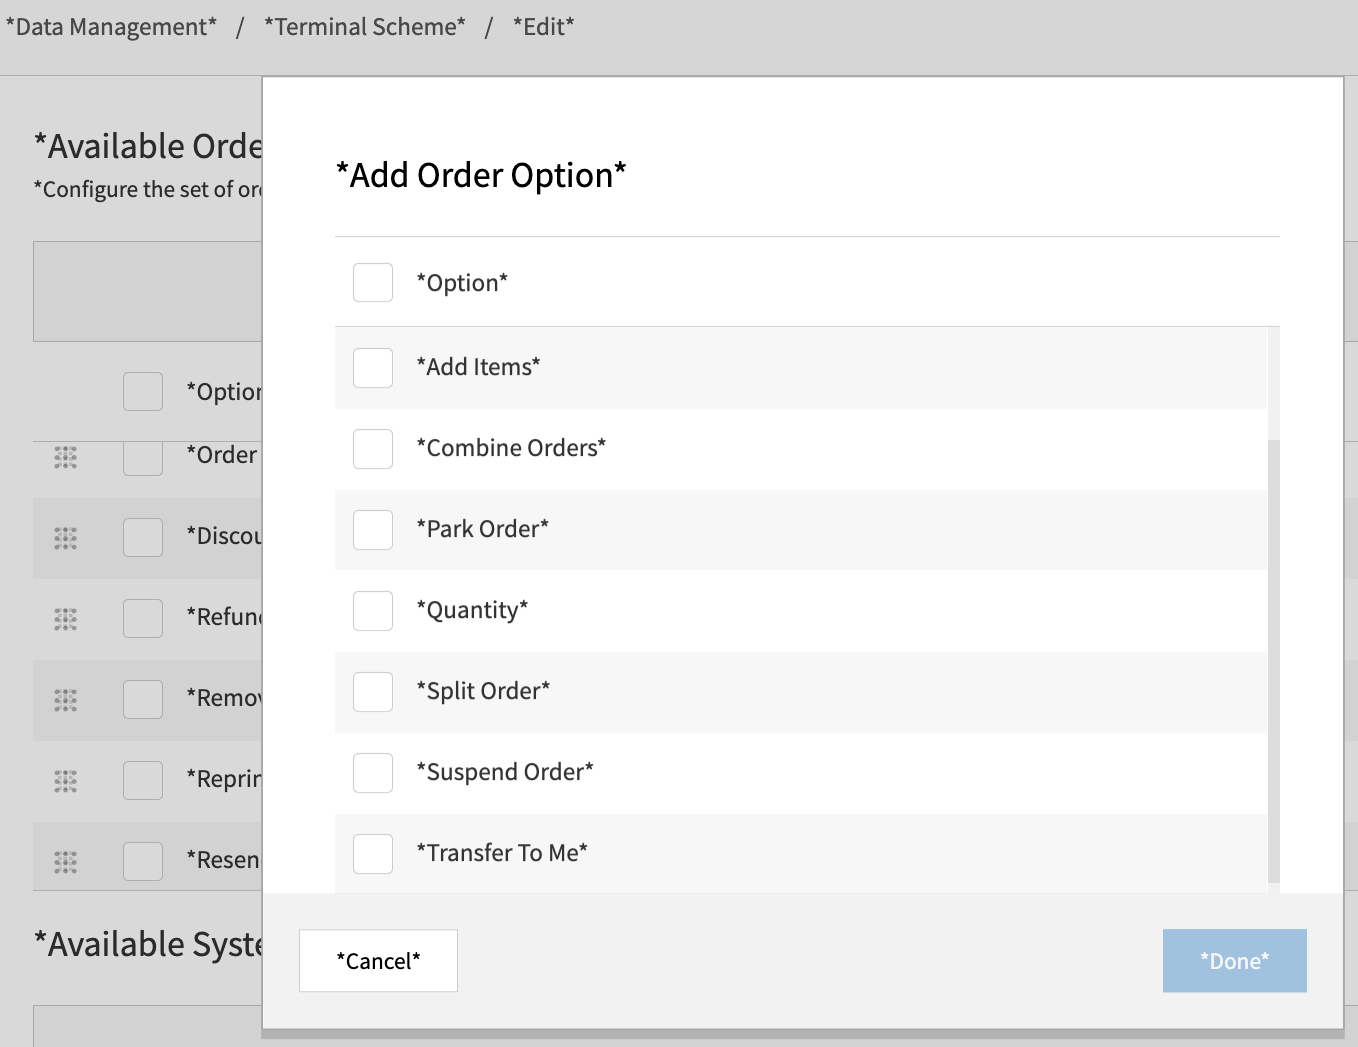
Order Entry - Available Order Options
Disable the following options:
Combine Orders
Split Orders
Add/Remove Gratuity
Start Tab
Void Post Payment
These operations are not certified and are not allowed to be used.
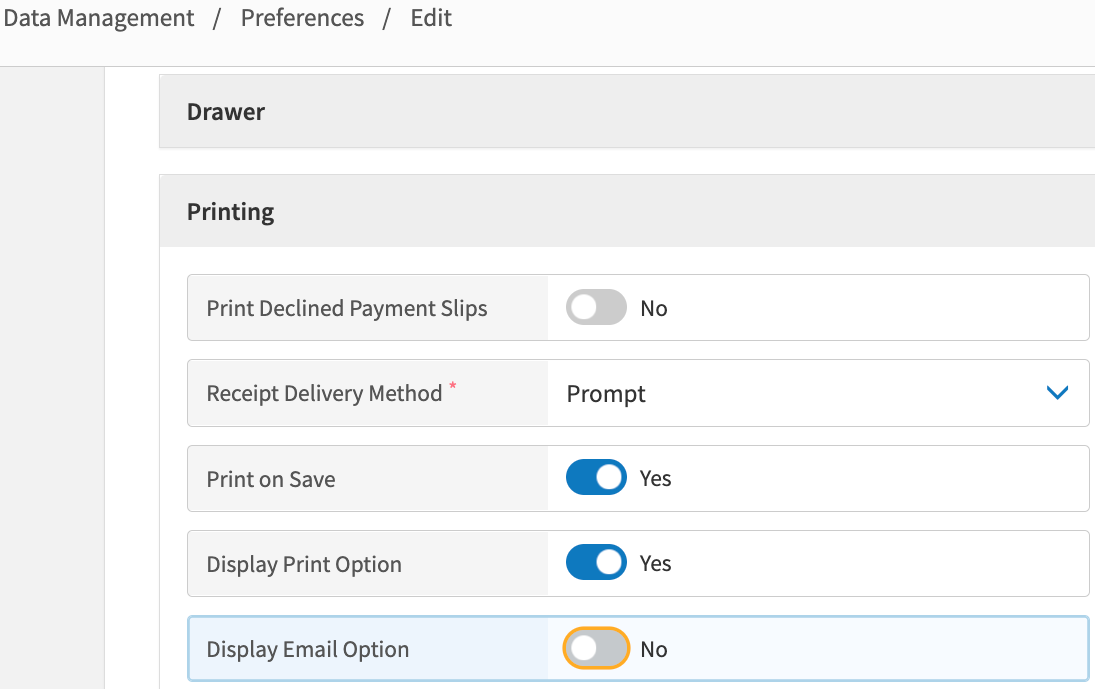
Printing
Disable the Display Email Option if Receipt Delivery Method is set to Prompt.
Sending by email is not certified.
From Site Preferences - Settings → Preferences → Edit site preferences → Select site → Site Preferences → Ordering Application, define the following:
Field Name
Value
Description
Printing
Disable the Display Email Option if Receipt Delivery Method is set to Prompt.
Sending by email is not certified.
Access
Uncheck Enable Floor Plans.
Table Service is not certified.
Screen Captures
Payment Methods and Destinations
Genius Portal → 4-Dot Menu → Data Management
From Data Management, define the following:
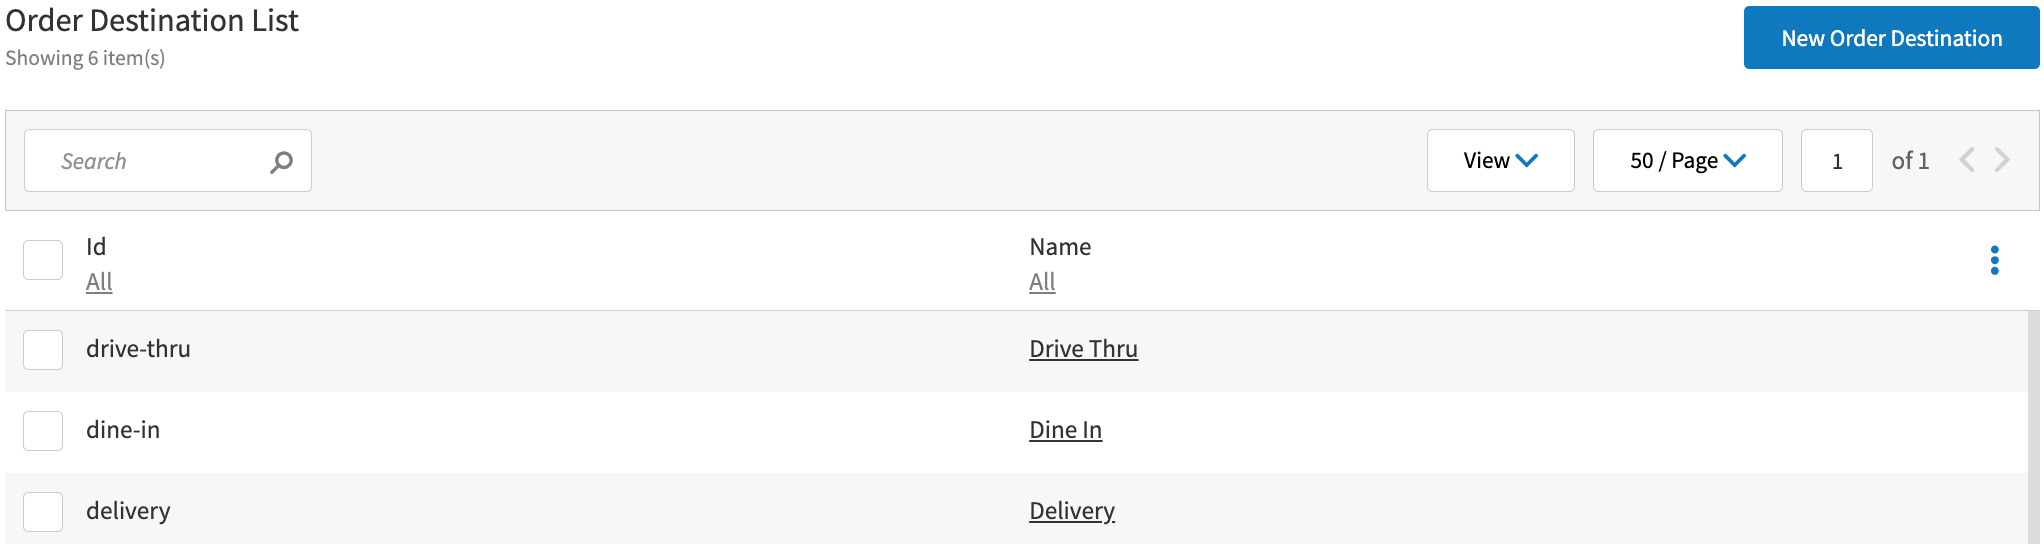
From the Order Destinations section - Ordering Settings → Settings → Order Destination, define the following:
Section
Value
Description
New Order Destination
Create and enable all necessary order destinations for the site.
See Create Order Destination for configuration steps.
Each order and item in the order are sent to the WEB-SRM service with the subsector attribute.
If a site operates in a different subsector, such as Restaurant or Food Truck, a different order destination is used for each of the subsectors.
The subsector sent to the WEB-SRM service is defined by the default subsector of the site or the subsector of the order destination, which are configured in the WEB-SRM service.
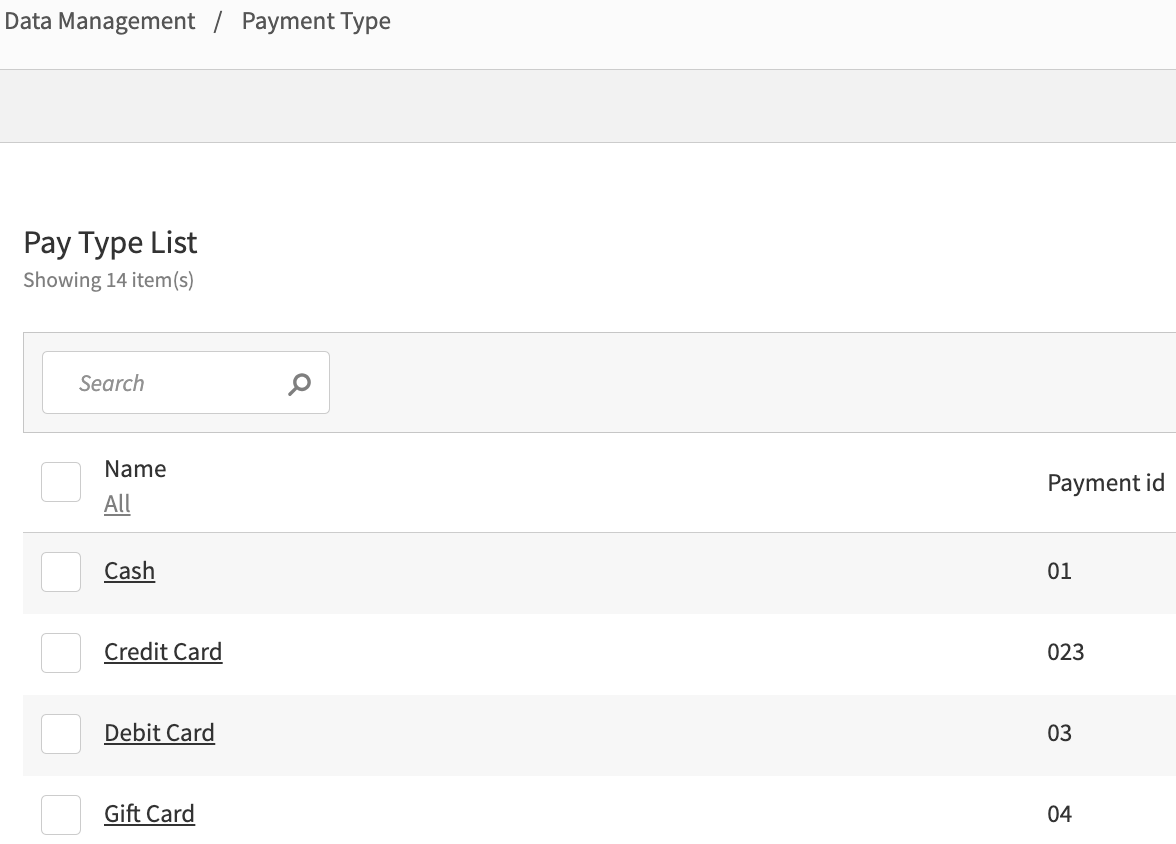
From the Payment Type section - Back Office → Payments → Payment Type, define the following:
Section
Value
Description
New Pay Type
Create and enable all necessary payment types for the site. Define which payment types are always used for E-Commerce payments.
See Payment Type for configuration steps.
If it is appropriate to identify an E-Commerce payment by payment type, the E-Commerce payment type is mapped in the WEB-SRM service.
Warning
Digital Wallet, Coupon, and Loyalty are not certified payment methods.
An E-Commerce payment is when the device used to pay for the transaction belongs to the customer and the payment is made using the merchant's software.
For example, a payment made through a website using a personal computer or through a mobile app on a smart phone or tablet is considered an E-Commerce payment. However, payments made using a payment service such as Apple Pay, Google Pay, or a virtual payment terminal (VPT) do not constitute an E-Commerce payment.
Screen Captures
Void Events and Reason Codes
Genius Portal → 4-Dot Menu → Data Management → Ordering Settings → Settings
From Data Management → Ordering Settings → Settings, define the following:
From the Company Preferences section - Settings → Preferences → Set company defaults → Ordering Application → Ordering, define the following:
Field Name
Value
Description
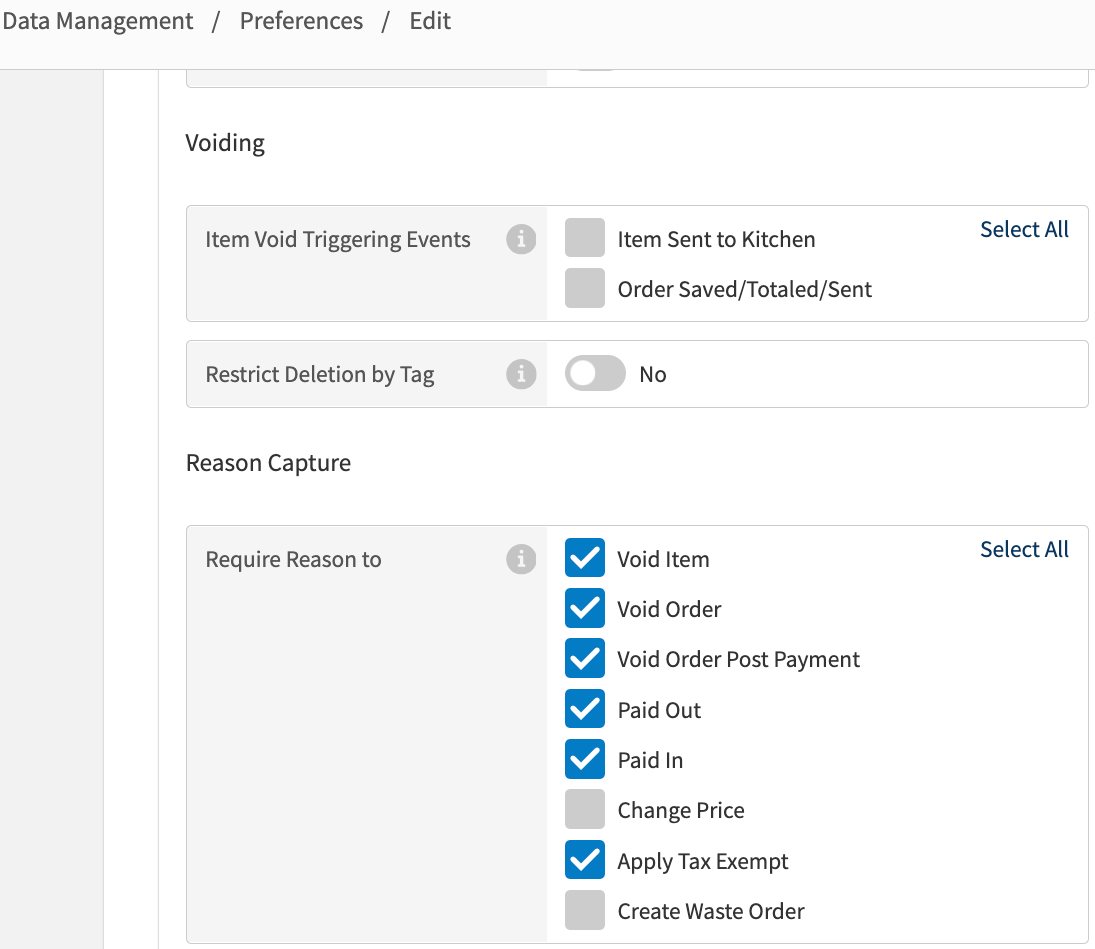
Voiding - Item Void Triggering Events
Enable at least one option from the following:
Item Sent to Kitchen
Order Saved/Totaled/Sent
When a customer leaves without paying the bill or if a customer refuses to pay the bill, the order is sent to the WEB-SRM service with the specific attribute that claims the transaction is the Failure to Pay PSP type.
This type of transaction must not have a payment. No bill is produced for the customer.
To mark an order as Failure to Pay on POS , the void triggering events is enabled for the company.
Reason Capture - Require Reason To
Enable Void Order.
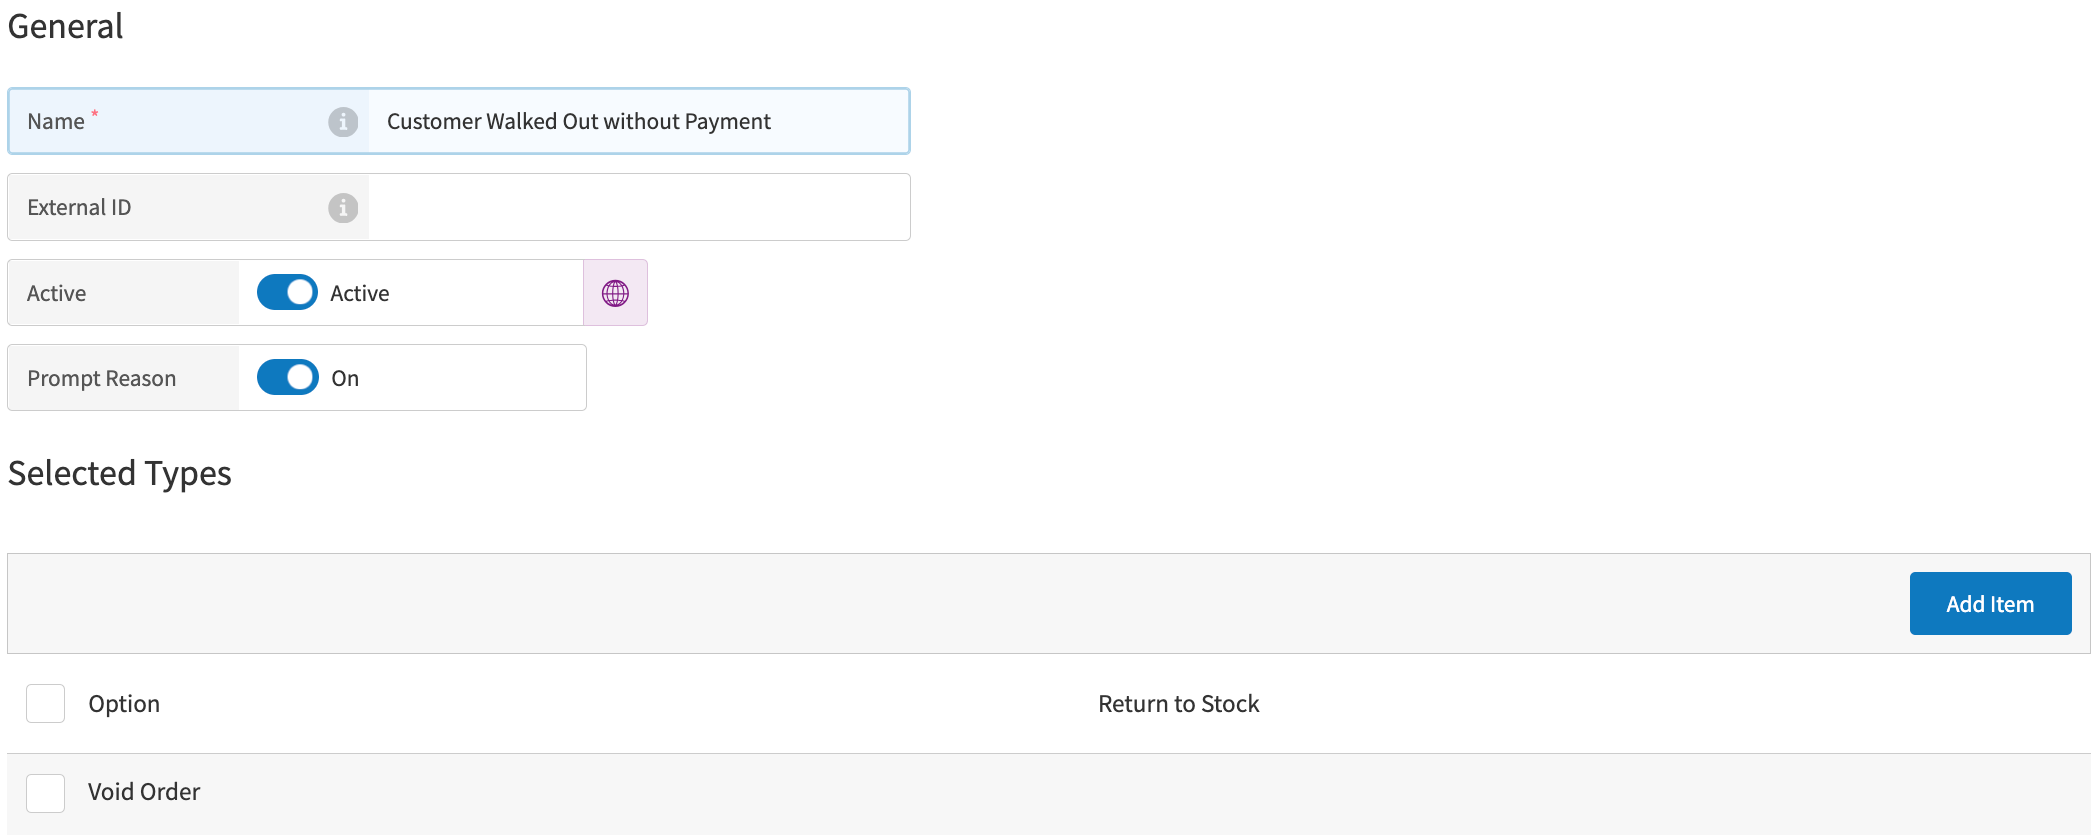
From the POS Reason Codes subsection - Settings → POS Reason Codes → New POS Reason Code, define the following:
Section/Field Name
Value
Description
Name
Any name that uses the Failure To Pay reason
To mark an order as Failure to Pay on Genius POS:
The reason code for voiding the order is enabled for the company.
The order is voided with a specific reason code, which is defined as Unpaid Reason Code.
See WEB-SRM: Unpaid Reason Codes for additional information.
Prompt Reason
Enable the Prompt Reason field.
Selected Type → Add Item → Void Order
Add Void Order to the Selected Type section.
Screen Captures
Fees, Gratuities, Tips, and Donations
For fees, gratuities, tips and donations, confirm:
Fees must have an assigned tax group with GST and QST taxes according to legal requirements. See Taxation and See Product Tax Group for additional information.
Note
The fee name is hardcoded to the value Frais de service in the WEB-SRM service transactions and receipts regardless of the name given in the Data Management configuration.
Gratuity and automatic gratuity are disabled for the WEB-SRM service sites when the Gratuity feature does not allow taxes on gratuity earnings.
POS Terminals
For the POS terminal configurations, confirm that the POS devices are set to Québec Universal Coordinated Time (UTC) time to ensure the transaction requests are sent successfully. Each transaction sent to the WEB-SRM service contains the time and UTC time zone from the POS device. If a transaction has time different from UTC -5.00 or UTC -4.00, an error is detected by the WEB-SRM service.
Data Management Configurations
Genius Portal → 4-Dot Menu → Data Management → Ordering Settings
From Data Management → Ordering Settings, define the following:
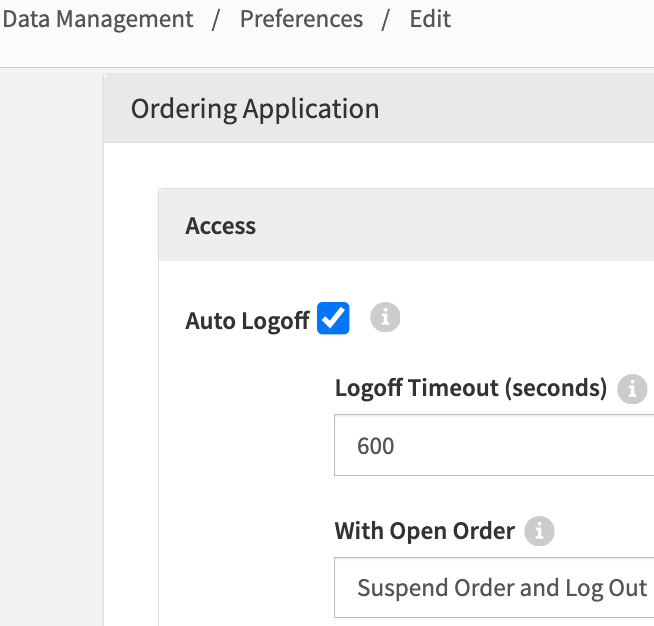
From Site Preferences - Settings → Preferences → Edit site preferences → Select site → Site Preferences → Ordering Application → Access, define the following:
Field Name
Value
Description
Auto Logoff
Enable the Auto Logoff field.
Legal requirements: If the user decides to close the application or shut down the device, the session must close automatically. If the Sales Recording System (SRS) is in sleep mode and there are multiple users for the same SRS, the application must ask users to log in again before it can be used.
With Open Order
Select Suspend Orders and Log Out from the dropdown menu.
From Terminals - Hardware → Terminals, define the following:
Section
Value
Description
Terminals
Configure the Terminal Number based on its usage in certificate nickname generation.
See Enable and Configure WEB-SRM Service for a Site and Terminals for additional information.
The Terminal Number is used for The WEB-SRM service certificate nickname generation. The three (3) digits are taken from the Terminal Number value. If the value is longer, it is truncated at the beginning of the number.
Screen Captures

Translations
Genius Portal → Settings and Tools → Languages
For POS and Genius Portal, the user interface (UI) will be translated to French for the WEB-SRM service integration.
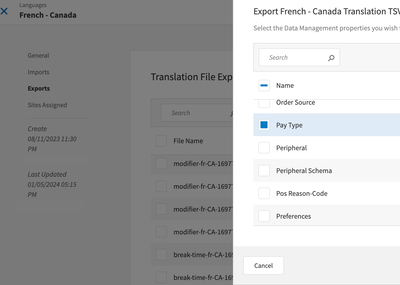
From Languages → French - Canada → 3-Dot Menu → Export Translation TSV, define the following:
Field Name | English Name | French Name | Usage and Risks |
|---|---|---|---|
Pay Type | Cash | Argent comptant | |
Check | Chèque | ||
Credit Card | Carte de crédit | ||
Debit Card | Carte de débit | ||
Gift Certificate | Certificat-cadeau | ||
Gift Card | Certificat-cadeau | ||
Digital Wallet | Portefeuille électronique | ||
House Account | Au compte NoteFor the House Account payment type, its printed name must differ from House Account WEB-SRM: PORTÉ AU COMPTE. | ||
POS Reason Code | The reason code is shown on the POS UI and should be translated in French. |
Screen Capture
Fiscal Logs: Configuration in Data Management
Genius Portal → 4-Dot Menu → Data Management → Ordering Settings → Settings → External Applications
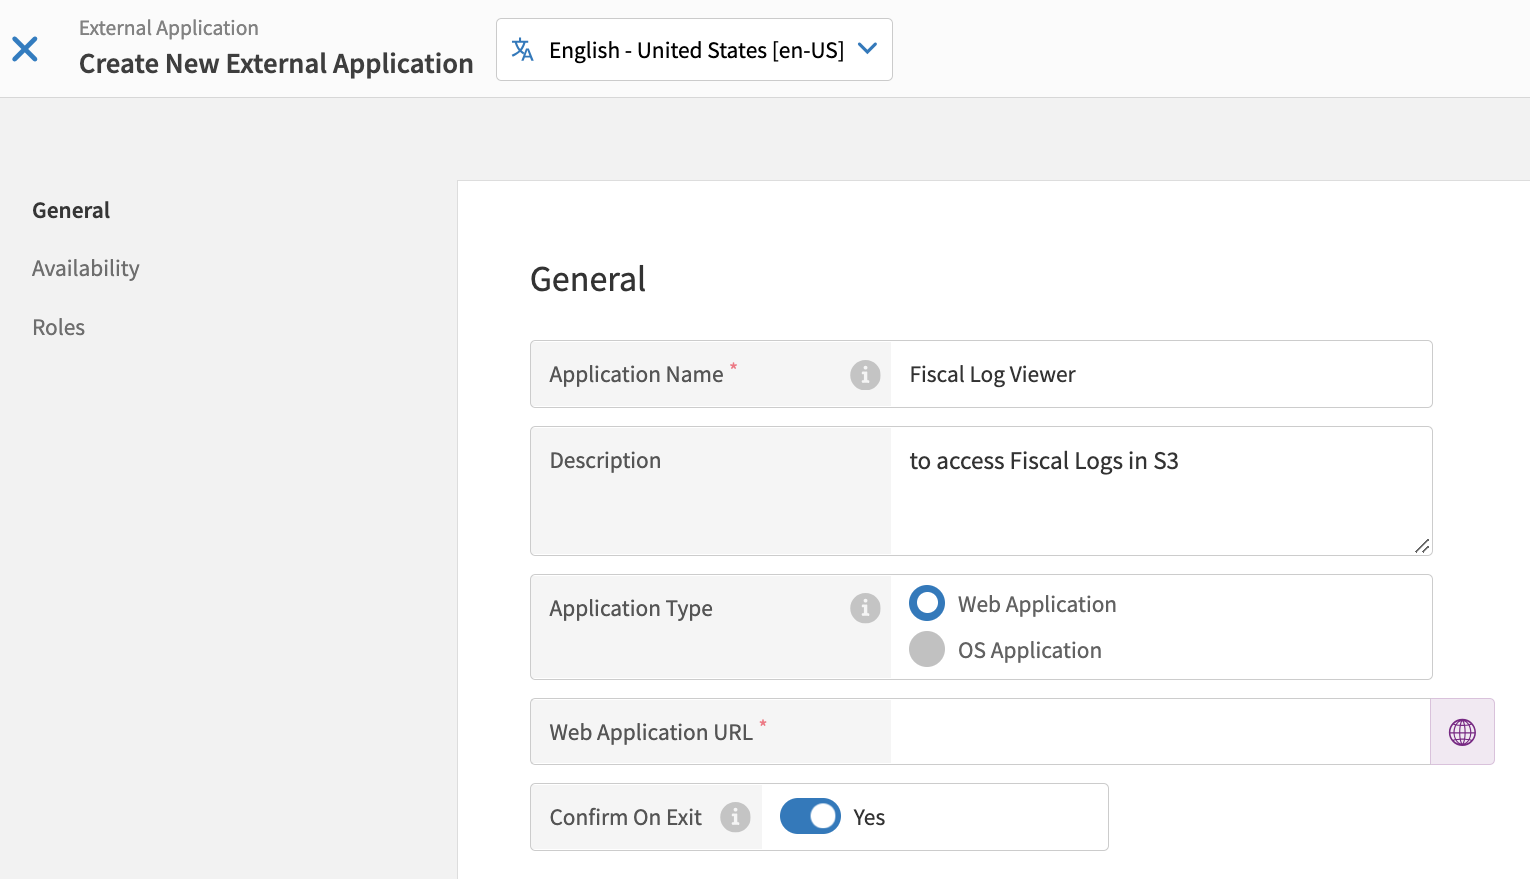
To configure Data Management to enable fiscal log access in the POS terminal:
From the upper-right of the External Application List screen, select Create External Application.
From the Create New External Application menu pane on the left, select General.
From General, define the following settings:
Setting
Description
Application Name
The recommended name is Fiscal Logs or Consultez les journaux. The name will be translated in French in XOP/Languages to be used in Canada/Québec.
Description
A description for the application's function. For example, To access Fiscal Logs in S3.
Application Type
Web Application
Web Application URL
This field should contain this URL, http://fiscal-logs.xenial.com/, which is the URL to the S3 bucket with the fiscal logs
Confirm On Exit
Toggle Yes
From the Create New External Application menu pane on the left, select Availability.
From Availability, toggle Active to enable availability for the site.
If needed, restrict user roles by selecting Roles from the Create New External Application menu pane on the left.
From Roles, toggle Yes for Restrict By Roles.
From Roles, select Add Roles or use the Search feature to enter the role name.
From the Add Roles popup, select the role name or use the Search feature to enter the role name.
From the Add Roles popup, select Add Role to restrict the role(s).
From the upper-right corner of Create New External Application, select Save to save the external application.
Screen Capture
Data Management - Create New External Application |
|